
Make Your Own Mobile Testing Device
There’s my mobile testing device I made for my workplace! There are some on the market; a couple I have seen are from Noldus, Tracksys, and there are many more but they usually cost a lot. There are also DIY ones such as from Nick Bowmast but what mostly everyone lacks is one that articulates. The one I’ve made can do that and also support multiple devices easily. I have been asked if I can make a full kit so if you’re interested, contact me. If you want to build a simpler version for yourself, keep on reading…
OMG, here’s a video of it in action…
[youtube_video id=”gNftGKodO-Q”]
Ok, on to the tutorial –
Non-articulating version that you can make yourself within an hour!
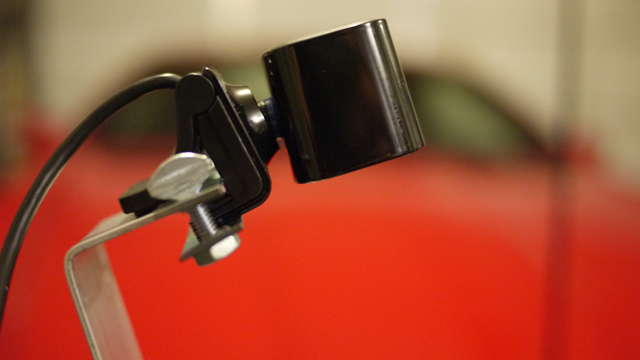
Parts List

- Microsoft LifeCam (HD-6000) x1
- Aluminium Flat piece (1/16 x 1-1/4 x 3′) x1
- Thumb Screws (8-32 x 1/2) x2
- Hex Nuts (8-32) x2
- Mending Plate (1/2″ x 3″ x 0.035) x2
- Velcro Industrial Strength x1
- An iPhone or any mobile device hard case x1
Tools (optional or can be substituted)

- Ruler
- Square
- Angle Finder
- Dremel
- Chop Saw
- Pencil
Step 1 – The device has 2 corners and the total length is 10 1/2″. The top side is 1 1/4″. The back is 6 1/4″ and the bottom is 2 3/4″. You sould mark a line at each of those measurements. First, cut the 10 1/2″ length and then use the other two marks to know where to bend it.

Step 2 – Cut!

Step 3 – Clamp the piece and remember to line it up with the line (for the top). Once it is secure, begin to bend it.

Step 4 – Stop at 10 degrees.

Step 5 – Take it off the clamp and then set it up to the other line (for the bottom). Once secure, start to bend it.Stop at 15 degrees.

Step 6 – Now that you have the basic shape, you just need to get the parts to put it together! The camera will be at the top and should be secured with the Mending Plates. With the two plates, it is held together by the Thumb Screws and Hex Nuts. You can also cut the plates as I have done for better aesthetics.

Step 7 – Screw together the Mending Plates.

Step 8 – Secure the camera and cut the velcro out and stick on to the bottom part and also to the mobile phone case.

Step 9 – Place the phone into the case, stick it to the testing device and test with your webcam software or user testing software such as Morae!

Note: The reason why I choose to go with aluminum is due to it’s lightweight and you can adjust the bending multiple times. You can use a different camera of course which may change the angles. This tutorial is pretty universal as most of the parts listed can be substituted for something else. I didn’t add in the articulation feature as the part is unique and takes more time to embed into the device (i.e. more parts, drilling, sanding).
Any suggestions, comments or questions? I’d really appreciate hearing from you if you build this device so feel free to contact me!
2 Comments
Join the discussion and tell us your opinion.
[…] couple I’ve seen are from Noldus, Tracksys, and there are many more but they usually cost a lot. Link – Trackbacks Posted in User experience (UX) | Permalink. ← 10 Tips for mobile […]
Hi David. Hats-off to you for making this setup and sharing the ‘how-to’.
Because not everyone has the time or resources to build their own, and, as you say, an articulated version is required to work with all devices, I created Mr. Tappy.
http://www.mrtappy.com
Nick.
New Zealand.